

Greetings, fellow enthusiasts! If you're stepping into the coding world for the first time, you're in the right place. This blog is your friendly guide to Git, the superhero of version control. Whether you're crafting your initial lines of code or joining hands-on collaborative projects, Git is your trusty sidekick. We'll break down the "what," "why," and the essential features, ensuring your Git journey starts off on the right foot.
”Why was the programmer's computer so smart? It remembered all the mistakes the programmer made and reminded them, "I told you so!" every time they tried to repeat them.”
In blog, we'll dive straight into the heart of Git, exploring its essence and practicality.:
What is Git?
Why Git?
Essential Git Concepts and Commands
In this blog, we'll take it step-by-step: from creating a new folder to adding code files, using version control, and saving everything online. It's an easy, friendly guide for beginners – let's dive in!
What is Git?
Git simplifies life for developers. Why? Because it's a version control system, or simply put, a time-travel mechanism for your code.
Now, consider this common scenario: You've been crafting a website, and as your codebase grows, so does the complexity. One day, a major change wreaks havoc, and undoing it seems impossible. No infinite Ctrl + Z here.
Enter Git. It allows you to rewind, review, and track changes in your code. No more irreversible mishaps. Git is your superhero in the realm of open-source version control systems.
Version Control Systems
Version control systems (VCS) like Git act as silent guardians for development teams. They store every twist and turn in your code's evolution, creating a safety net.
Picture this: A bug emerges post a significant code tweak. With Git, you're not stranded. You roll back time, compare versions, and fix the glitch without chaos.
Git isn't just code management; it's your secret weapon against coding mayhem.
Git
Git is one of the most popular version control systems. Git is known in the industry because it's: free, open source, fast, and scalable.
GitHub is one such platform that leverages the functionalities of Git and makes it more efficient for collaborating and maintaining source code with other developers.
To start, Install Git on your machine. Here's documentation that helps you with Installing Git. (Trust me it’s super simple)
To check whether you have Git installed successfully, enter this command in your command line.
git --version
Output
git version 2.xx.x
Traditionally, operations with Git are performed using the command line of an Operating system. There are GUI tools that help you perform Git operations you decide to suit your application best. Git also integrates with some of the most popular code editors, such as Visual Studio Code, Sublime and Atom.
For a better understanding of Git concepts, we will use the command line. In this module, we'll look at some basic and frequently used Git concepts such as:
Repository
Workflow
Modify
Stage
Commit
Remote
Branching
Merging
Merge conflicts
Repository
A repository in Git consists of two things:
Your source code files (Just like a regular folder)
Log of all the changes and branches of the code
These logs and code versions are kept in a hidden folder named ".git". It's hidden because it's best not to tamper with the
.gitfolder.
Let's start with the hands-on!
We begin by initializing a repository with the git init command. Initializing with Git means setting up a new folder on your computer where Git can start tracking and saving changes to your files. It's like attaching a tracking device for your project's files.
There are two straightforward ways to do this:
Method 1: Create a folder + Initialize with Git — Best before scenarios when starting a project from scratch.
Method 2: Initialize Git in an existing folder — Ideal when you already have a project and now wish to initialize it with Git.
Navigate to the project root folder to initialize it as a Git repository, and we create an empty folder that already has a .git sub-folder in it.
git init MyProjectOutput
Initialized empty Git repository in /MyProject/.git/We have created a new folder with the name "MyProject" using the
git init <folder-name>command. This LearnGit folder contains nothing but a .git folder. Generally, you use this method when you are about to start a new project from scratch.You may use the second method if you already have a folder containing the source code and other files.
Say you already have a project, then we can initialize the repository with an existing folder with Git. In cases where you already have a source code and want to leverage the features of Git in that folder. Let's say you have a folder named "MyProject", which contains an HTML file.
Navigate to the target folder.
cd MyProjectInitialize this repository using
git initcommand.git init
Note: While initializing a repository for an existing folder do not specify the folder git init {folder-name}. Simply navigate inside the folder via the command line and type
git initin the command line.
Voilà! You can now perform git operations in the folders you just initialized!
Including a README.md file in your repository is a good practice because it helps you and other developers understand the project.
Workflow — Modify, Stage, Commit
For the sake of this tutorial, we will work in a repository named "MyProject". For inclusivity, we're going to use a folder named "MyProject". To keep things simple and inclusive, we won't use any complex programming language. We'll just use plain text files (.txt) for our Git examples.
Think of Git like a snapshot tool for your project. Every time you decide you're happy with your changes, Git takes a snapshot of your files. This process is called committing. Each snapshot is known as a "commit", and it's like a saved version of your entire project at that specific moment.
1. Modify
"Modify" refers to any change in any files in the repository. That include:
Creating new files
Editing files
Removing files
So go ahead and create two new files named file1.txt and file2.txt with some text data.
This is considered a modification as we are creating two files with some data.
2. Stage
Now that you have added two files to the repository. Let's see what Git has to say about this!
To check the situation of the repository, enter the command git status:
git status
Output:
On branch master

No commits yet

Untracked files:
  (use "git add <file>..." to include in what will be committed)
        file1.txt
        file2.txt

nothing added to commit but untracked files present (use "git add" to track)
As you can see, file1.txt and file2.txt are written in red, indicating they are "Untracked". It means these files have been created in the folder, but the git tool has not yet registered these changes in its system.
Stage means you are intending to introduce these changes in the code base.
Imagine this: You're at a grocery store. You pick up apples and bread (modify). When you put them in your shopping cart, that's like staging them (stage). You haven't bought them yet, but you're planning to. Just like in Git, staging means you're preparing to make a final decision on these changes.
By staging, you inform Git to include these files in the most recent commit. Note that, according to Git, you have not yet added these files; you have simply informed Git that you will be adding these files.
To stage your changes, use the add command:
Method 1: Use this method to choose the files you want to stage.
git add file1.txt file2.txt
or
Method 2: This method is used to stage all the files in the folder.
git add .
Let's recheck the git status.
git status
On branch master

No commits yet

Changes to be committed:
  (use "git rm --cached <file>..." to unstage)
        new file:   file1.txt
        new file:   file2.txt
Now Git knows what you will commit as you have staged those files.
3. Commit
After you've placed apples and bread in your shopping cart (which is like staging in Git), the next step is to buy them. In Git terms, this is called a "commit.”
In our case, you have finally informed Git that you want to include file1.txt and file2.txt in the upcoming commit.
To commit your changes, type the command git commit -m "A short message about this particular commit or version"
git commit -m "Added two files in the project."
Output
[master (root-commit) c083325] Added two files in the project.
 2 files changed, 2 insertions(+)
 create mode 100644 file1.txt
 create mode 100644 file2.txt
In the output, we have a short summary of our latest changes.
2 files changed:
file1.txt
file2.txt
2 insertions(+):
Hello World in file1.txt
Hello World in file2.txt
Note: Git only commits staged changes, i.e. to register changes to the Git, you must stage those changes first.
Implementation
Let's simplify and understand what we have done till now.
Git helps you keep a record of what's happening in the project.
Modify: We added two files in our project with some text.
Stage: We stage (inform Git) that we are planning to create a commit (or version) that records that "2 files have been added".
Commit: We finally commit those changes. Here, Git takes a snapshot of your project and writes down what it looks like and how it compares with your previous commit (or version).
Assume you want to add a new feature to your application but are concerned that doing so will break your application. So, before you develop those features in the main source code, you duplicate your entire project code and modify this duplicate project to add your new feature. This is known as branching.
When you are done testing the feature in your duplicate application, you merge this duplication application code with the main (original) application so that your new feature is now a part of your original application.
So, you need branching for two reasons:
Add a potentially risky feature (or code) to your project
For better collaboration management
Let's see branching and merging in action for better understanding. We will stick our existing repository, "MyProject" which contains 2 text files:
To create a branch, type the command git branch {branch-name}
git branch new-feature
A new branch named "new-feature" has been created. You can create as many branches as you want for a repository.
To list all the branches in a repository, use the command git branch:
git branch
Output:
* master
  new-feature
Here, master is the main branch where our original code resides. The new-feature branch is the latest branch we have created. Both branches contain the exact same content (2 text files).
Any change in the "master" branch will not be reflected in the "new-feature" branch and vice-versa.
The master branch is highlighted in green along with an asterisk *. This indicates that you are currently in the master branch. We want to switch to our "new-feature" branch to work on this new feature.
Switching between branches is a fairly simple concept.
Type the command git checkout {branch-name}
git checkout new-feature
Output
Switched to branch 'new-feature'
You have now switched from master —> new-feature. To verify this switch, Type git branch
Output
  master
* new-feature
You can see the asterisk pointer * now points to the new-feature branch with a green highlight.
Let's create a new file in this branch and then merge it with the new-feature branch with our master branch. We will create a simple text file named "file3.txt" with the text "Learn Branching".
Type git status to check the situation here:
git status
Output
On branch new-feature
Untracked files:
  (use "git add <file>..." to include in what will be committed)
        file3..txt

nothing added to commit but untracked files present (use "git add" to track)
The first line says On branch new-feature, there's an untracked called file3.txt. Let's stage and commit this file to our branch.
Stage:
git add .
You can check with git status again to see the staging area.
Commit:
git commit -m "file3.txt added"
Output
[new-feature 3816b5d] file3.txt added
 1 file changed, 1 insertion(+)
 create mode 100644 file3..txt
You have created, staged and modified a new file in the new-feature branch. Consider adding a new feature in your application just like this. Let's merge it with our master branch.
To merge your change into the master branch, we need to shift toward the master branch.
git checkout master
Switched to branch 'master'
TIP: If you go to Windows' file explorer or type ls (in Linux). You will not find "file3.txt." This is because you are in the master branch, where file3.txt does not exist. But you can see file3.txt if you switch back to the new-feature branch (use git checkout new-feature to switch).
Now that you are in master branch let's perform the merge operation. Use the git merge <branch-you-want-merge-from>
git merge new-feature
Output
Updating c083325..3816b5d
Fast-forward
 file3..txt | 1 +
 1 file changed, 1 insertion(+)
 create mode 100644 file3..txt
The new-feature branch has successfully merged into your master branch. You can even see the file3.txt in your current folder/directory.
Saving your code online with GitHub
So far, we've been doing all our tasks locally. This means that all the changes are committed to the local machine only. Other developers have no idea or access to our work.
You allow other developers to contribute to your project or repository, and you publish your project online on platforms such as GitHub.
GitHub is an online portal that hosts your repositories. You can even host your own local repository and stay in sync, making collaboration with other developers worldwide much easier.
This is one of the key reasons why Git (and VCS in general) exists: Collaboration
GitHub allows developers in the same team to view and contribute to the project simultaneously without overwriting each other's work.
Let's get started and make our local repository online on GitHub.
IMPORTANT: You need to create a GitHub account if you don't have one already, to follow the further steps.
Let's create a new online repository on Github. This repository will reflect our local repository every time we sync our changes online.
-
You can create a new repository with this URL: https://github.com/new.
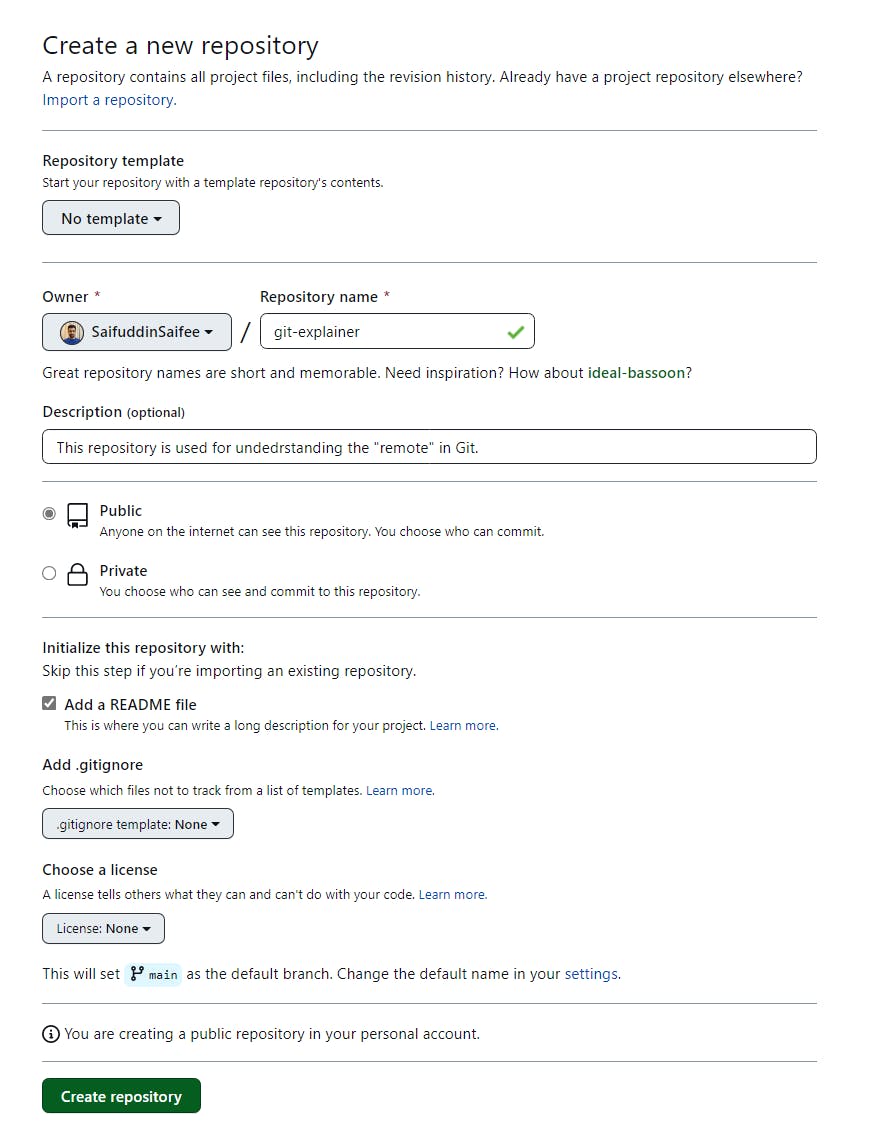
Give your repository a name
Add some description
Select the Public option
Check the Add a README file
Leave other settings as they are.
- Copy the push script or type it in your command:
Push your repository with the command line
git remote add origin <https://github.com/SaifuddinSaifee/git-explainer.git>We have now attached our local repository with the online repository (on GitHub). Note that this online repository is still empty. So now, let's push our local project onto the online repository.
git branch -M mainWe push our changes from the local repository to the online repository in the
mainbranch.git push -u origin mainWe pushed our "master" branch of local repo —> "main" branch of our online repo using the
git push -u origin maincommand. You can find all three of our files, which were kept in the local repository, as shown in the image below.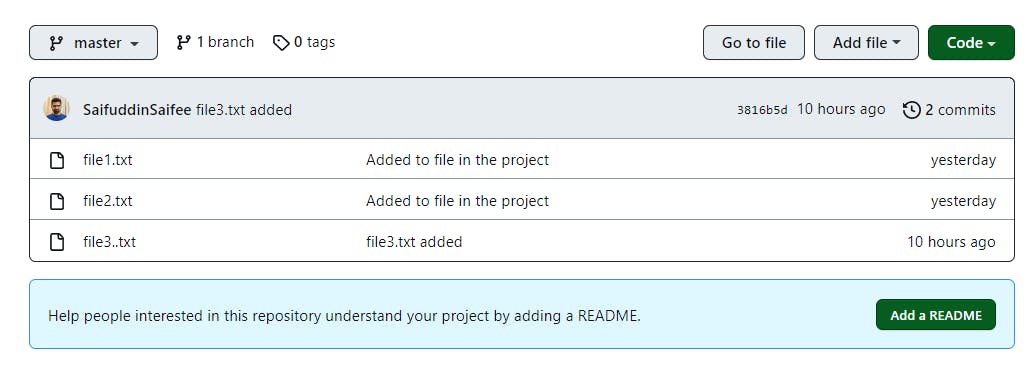
Implementation
Let's add more files to our local repository and push them to origin. Feel free to follow along as this is just an implementation of everything we learned till now
Create a README.md file With the text "Implementing push commands."
git add .to stage our newly created filegit commit -m "Added aREADME.mdfile"to commit our change in our local repositorygit pushto push this commit to our online repository
Pull
Let's create a new file in our online GitHub repository named "file4.txt".
Click
Add fileSelect
Create new fileName the file "file4.txt"
Scroll down to the bottom and commit the changes
Let's pull this repository to our local repository. Type the command git pull
git pull
This command will fetch all the latest changes our online repository has. If you open the file explorer, you will find a new file name, "file4.txt".
Let's edit this file and push it back online. Add some text in the file4.txt.
Stage these modifications with
git add .Commit file4.txt by
git commit -m "Added data in file4.txt"Let's push this code online by
git push
git add .
git commit -m "Added data in file4.txt"
git push
If you go back to our online repository, you will see a change in file4.txt. It has some data that we added locally.
Merge Conflicts
Git is widely known for its version control management; it is also widely praised for making "Collaboration" more efficient. Collaborating on a project with other developers is excellent as it boosts productivity and load balances the entire project.
Collaborating can be a very systematic yet delicate procedure and must be handled with the same mindset.
We'll learn about "Merge Conflicts", one of the most common aspects of collaboration that demands a lot of patience. To understand this better, let's consider a scenario.
Modification in the same region
A team consists of two developers, Marco and Sara, working on a joint project.
Marco pulled the remote repository of "MyProject" to a local repository, made some changes in file1.txt, staged, and commit those changes.
While Marco was busy making changes in his local repository, Sara pulled "MyProject" from the remote repository into her local repository, made changes in file1.txt, staged the changes, committed them, and pushed them online.
As soon as Marco tried to push his changes, Git prompted him that the repository he pulled had already been updated by Sara. Marco has made changes to an old version of the repository.
So, he pulled the latest repository again and made the changes in file1.txt.
And then he received a warning of
merge-conflict.
This "merge conflict" occurred because Sara and Marco pushed their changes in the same file and in the same region of the file (say line 4 to line 10).
In case of a merge conflict, Git presents a new change that includes both the changes; like such, assume this is file1.txt:
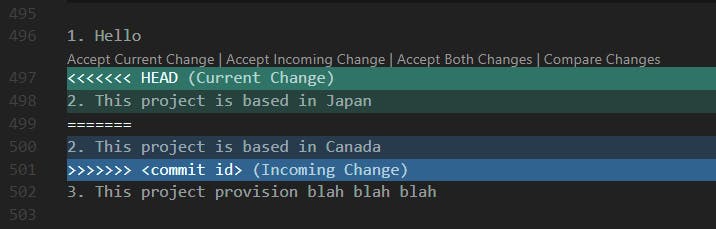
alternative snippet:
1. Hello
<<<<<<< HEAD
2. This project is based in Japan
=======
2. This project is based in Canada
>>>>>>> <commit id>
3. This project provision blah blah blah
The HEAD represent the changes you have made, Incoming Changes means the changes that already exist in the repository.
Now, it's up to Sara (or the project handler) to decide which of those changes is more suitable for the file. Once the changes are made, she will stage, commit and push the changes. Hence, Merge-conflict resolved.
Merge conflicts are to be handled with a proper discussion of the changes.
Congratulation! You've got the basics! Now go ahead and use Git in your projects. Git is one of the most powerful tools for a developer and contributes significantly to the Software Development Lifecycle. But always remember, "With great powers, comes great responsibility". Be sure to check the previous blog to All you need to know to get started with DevOps.
I hope you found this guide useful! Remember, using Git is one of the top practices in development – it's a game-changer for managing your projects efficiently. I'm always open to feedback, so feel free to share your thoughts. Until next time, happy coding, folks! 🚀✨